Overview
In this example we're going to model a process that involves two users. The first is a member of the public who fills out a form on your website. The second is a customer service agent who works for your organisation.
When the first user submits the form, a task is assigned to the customer service team. One of the team carries out the task, replying to the user. The process then sends an email to the original user.
You can find out about launching the process modeller and editing and deploying a process in the Workflow Processes documentation.
You can download the two forms and workflow model described in this tutorial from the downloads section of this article. The zip file includes instructions to help you set things up in your own iCM.
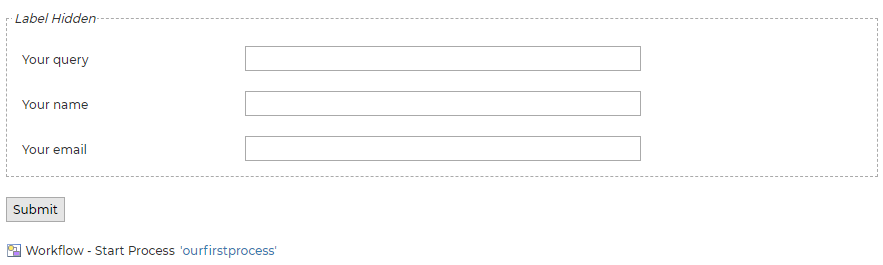
A Form to Start the Process
We need two forms for this process. One to start the process and another one for the agent's response. Values from the first form are passed to the process and can be used in the second form.
Our first form, called STARTASIMPLEPROCESS (Start A Simple Process), has the following fields.
| Field Type | Name | Description |
|---|---|---|
| Text Input | QUERY | This text field allows the user to ask a question |
| Text Input | NAME | A field for the user to enter their name. We'll use this name in our process model |
| Text Input | We need to know the user's email address so we can send them an email | |
| Workflow Start Action | START | This action field is used to start the workflow process. In this example we aren't going to use any of the advanced options. All that needs to be set is the name of the process we'd like to start. The "Process Definition" property lists all of the processes in the workflow engine. You'll need to come back and fill out this field once you've created and deployed the process model below. |
When this form is submitted, process variables called form_QUERY, form_NAME and form_EMAIL will be created in the process instance.
The values of these variables are the values of the form fields. You can display these values on subsequent forms in the process by including form fields with the same names.
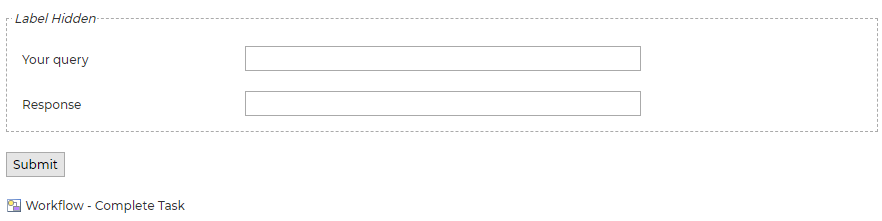
A Task Form
The second form, used by our agent, is called COMPLETEASIMPLEPROCESS (Complete A Simple Process). It has the following fields.
| Field Type | Name | Description |
|---|---|---|
| Text Input | QUERY | This field will display the query submitted by the first user. You can set this as "read only" so the agent can't update it. Note how the name of the field is the same as in the start form. When a form field has the same name as a process variable that already exists in the workflow, it will display the value of the process variable. We call this mapping the value of the process variable |
| Text Input | RESPONSE | This is the field the agent will type their response into |
| Workflow Complete Task Action | END | This action field completes the user task, passing the process on to the next stage of execution |
The Workflow
Our process model ties our two forms together and sends an email.
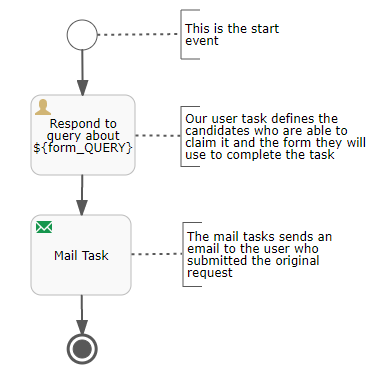
It has the following elements.
| Element | Description |
|---|---|
| Start Candidates | The users who are allowed to start our process - ie the visitors to our website |
| Start Event | Every process has a start event, usually a form submission |
| Start Form | The form that our user will submit to start the process |
| User Task | The task carried out by our agent |
| User Task Candidates | The group of users who will carry out the user tasks |
| User Task Form | The form our agent will fill in to complete the user task |
| Mail Task | The mail task that will send a confirmation email to our start user when the task is complete |
| End Event | This ends the process execution when it is reached |
Model Properties
When you first create or edit a model, without selecting any of the elements, the properties section beneath the work area displays the properties of the model itself.

| Property | Description |
|---|---|
| Process Identifier | The unique identifier of the process definition. This is generated automatically when you create your model |
| Name | The name of the process definition, displayed within the modeller. |
| Namespace | This is how the model is organised in the modeller, it doesn't affect the process or how it is used |
| Description | The description of the process definition, displayed in products like the Self Service template. This value can include form field values using the ## substitution method. |
| Candidates | Only the users (or user groups) selected here are able to start instances of this process. These will normally be logged in site users, which is useful so we can access details from their user profile, but can also be the anonymous/public user. If you want users to be able to track their requests in the Self Service and User Request templates you'll need some way to identify them, in which case it is best if they have to log in before they start a process |
Start Event
Every model must have a start event. For our example, leave all of the properties as their defaults.
User Task
The user task assigns a task to one of our agents. In this example we can leave most of the properties blank, but you will always need to set the name, candidates and iCM form.
| Property | Description |
|---|---|
| Name | This name will appear in the claimable task lists in templates like Self Service. You can include values from the form submission that started the process instance (or any other process variable). For this example, use |
| Candidates | Select the users or user groups you would like to be able to claim this task. This should be a group that represents "staff" members |
| iCM Form | This is the form that will be used to carry out the task. For this example, select the "Complete a simple process" form described in the previous step |
Mail Task
Once our agent completes the user task, the process execution is passed to a mail task. In this example we're going to use elements from both form submissions to construct our email.
| Property | Description |
|---|---|
| Name | The name of the task isn't visible in normal use, but can be useful if you need to debug any errors. For this example call it Mail Task |
| To | We want to send the email to the original user who submitted the query. The user supplied their email address in a field called EMAIL, so we can access that email address using |
| From | Any "from" address you enter must be authorised and verified to be able to send emails from your domain. Leave this field blank to use the default set for your platform |
| Subject | This is the subject line of the email. Just like the email address, we can use a value from the form submission. Enter |
| HTML | This will make up the body of the email. In this example we're going to include a value from the original form and a value from the agent's response.
|
End Event
The end event stops the process execution when it's reached. End events end this branch of the process execution. Terminate events terminate the entire process execution, even if it has multiple branches.
As our example only has one line of execution, either can be used.
Save and Deploy
Save and deploy your workflow model. It will now be available as a process that can be selected in the Workflow start Action form field and be displayed on articles using the User Requests and Self Service templates.
Edit the Start Form
Now that the process model has been saved and deployed, we can tell the STARTASIMPLEPROCESS form to start instances of it. Edit the start form and select this process in the "Process Definition" drop-down of the Workflow Start Action field. Processes are listed by name, then deployed version number. Unless you need to access a specific version for testing, it is generally best to select the "latest" version to be started when the form is submitted.
Next Steps
The forms and workflow process are now set up. You'll need to create an article to display the start form. This article should be secured to the same user group who are eligible to start the workflow process. When the form is submitted instances of the process will be started, linked to the user who submitted the form.
The Self Service and User Requests - Interacting with Workflow Processes series of articles looks at the ways you can set up your website articles and templates, and how to customise the workflow model.
Share this page


