1. Overview
Before starting this tutorial you should be familiar with using the forms designer and building multipage forms.
The tutorial uses the form built in Multipage Forms and Navigation as a starting point.
What you'll learn
By the end of this tutorial you'll be able to create summaries at the end of a form so a user can check their answers, learn about page modes, and be able to show and hide fields depending on the mode.
What you'll build
A form with four pages. The final page displays a summary that includes links to go back and edit previous pages.
There are two approaches to building this form:
What you'll need
- A browser with access to iCM
- iCM user permissions to add, edit and publish forms
- iCM user permissions to add edit and publish articles
- An area of your site, or development site, where you can safely publish test content
2. Setup
If you've already completed the Multipage Forms and Navigation tutorial, you can use that form as the starting point.
Your form should have the following pages:

Download
If you don't have a suitable form, download and import Multipage Finished Form (ZIP, 4 KB).
If you need to recap importing forms, see the Showing and Hiding Form Fields Setup Instructions.
3. Create a summary
The summary created in the Multipage Forms and Navigation tutorial displayed the values entered into all of the fields of the form in a table.
This time we're going to create a card to display each page, which automatically includes edit links so a user can go back and change their answers.
HTML template
Using the same HTML template (server side) field as the previous tutorial, this time pick "Non Blank Summary Card" for all pages:
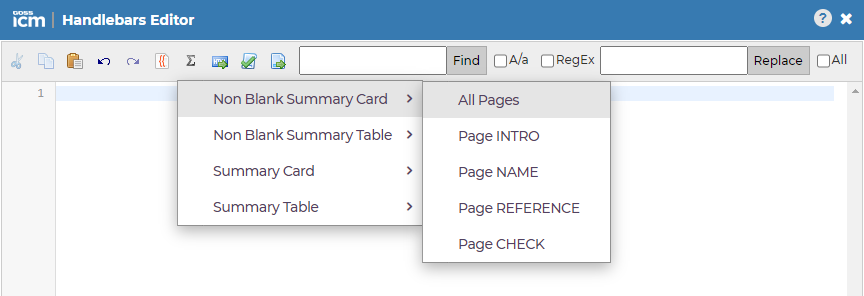
This will generate a template that includes all of the form pages and fields. Each page is represented by a card, and each card includes an edit link:
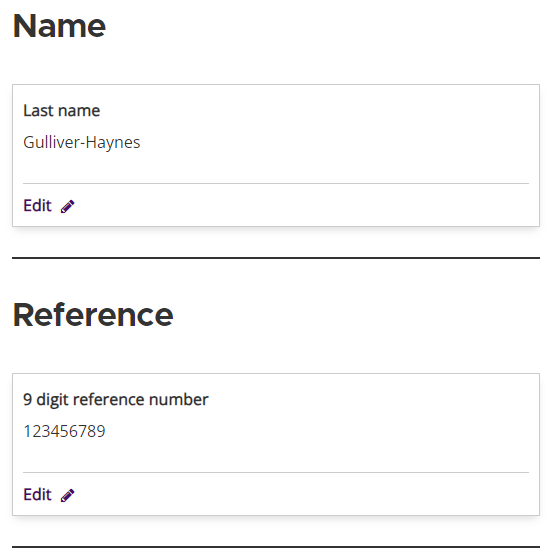
You can edit the template to exclude elements or add additional text.
Edit links
The edit links are generated by these lines in the template:
{{NAVIGATIONBUTTON action="BACKLINK" label="Edit" extraClass="summaryaction cta-link cta-link--link cta-link--edit" pageName="NAME" mode="EDIT"}}
The important parts are:
- action="BACKLINK" - The template will create a back link rather than a button
- label="Edit" - This is the text visible on the page, you can change it if you want to
- pageName="NAME" - The page that the link will take you to
- mode="EDIT" - The page will be displayed in edit mode. This mode is used by the wizard button fields to work out which buttons to display
The Navigation Button Helper article has more information about creating buttons using Handlebars.
4. Navigation style
So far all of the forms we've built in the tutorials have used the Navigation Button field to provide next buttons and back links on each page. We've done that because the GOV.UK Design System recommends you should (https://design-system.service.gov.uk/components/back-link (opens new window)).
The look and feel of your forms is ultimately up to you. This tutorial will now show you two different ways to add navigation to your form. Read the next two sections before deleting any fields from your form.
The wizard button approach in the next step is the simplest to build.
If you want to use back links the design is slightly more complex, because you'll have to had some show/hide logic into each page of your form. That's covered in step six.
5. Navigation with wizard buttons
The Wizard Buttons field type is great. It is an intelligent field type that knows whereabouts it has been placed in a form and automatically displays relevant buttons.
In a multipage form it will provide a "Next" button on the first page, "Back" and "Next" buttons on middle pages, and "Back" and "Submit" buttons on the final page. If a page has already been submitted, and the page is being revisited in "edit mode" you'll see "Update" and "Cancel" buttons.
Delete the navigation buttons
If you have been following the tutorials, your form will already have navigation buttons and back links on each page:
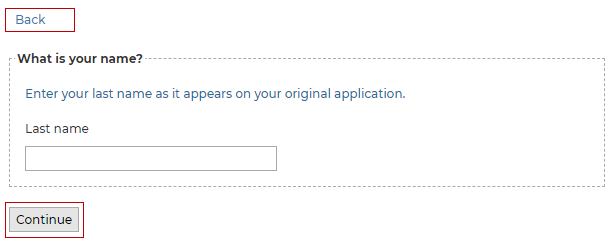
Delete these fields if you just want to use wizard buttons for your navigation.
Add wizard buttons
Add a wizard button field to the bottom of each page of your form.
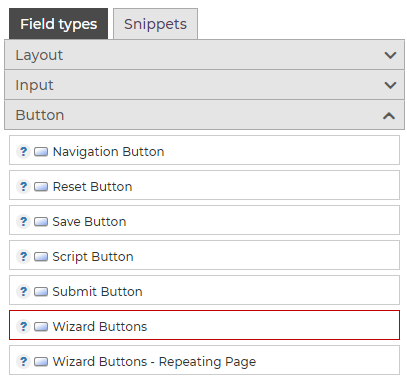
The forms designer will display all of the possible buttons the field might output:
![]()
There's no need to edit any of the field settings.
Save and publish your form to see how the buttons behave. Notice how, when you navigate back to a page using the edit links on the final page, the wizard buttons display "Update" and "Cancel" buttons. Both of these buttons will take you back to the final page.
6. Navigation with navigation buttons
This approach uses navigation buttons to provide next buttons and back links, and wizard buttons when editing pages.
Add wizard buttons
Add a wizard button field to the bottom of each page of your form.

However, because our form is using navigation buttons, we'll need to hide the back button this field provides:
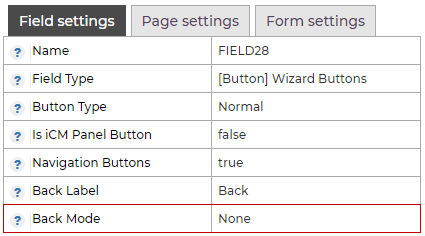
Now the field will only display the next button when someone is filling out the form, and update and cancel buttons in edit mode:
![]()
Hide the back link in edit mode
The next step is to hide the back links when the page is being edited via the check answers page. You don't have to do this, but it does make the form neater.
To do this, first find the "Client Init Handler" in the "Page Settings" tab:
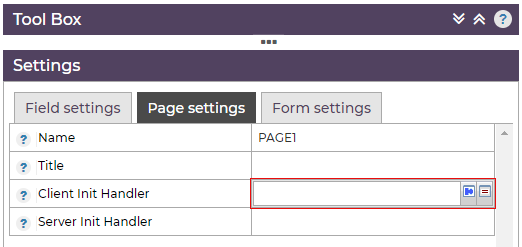
Then open the script editor:
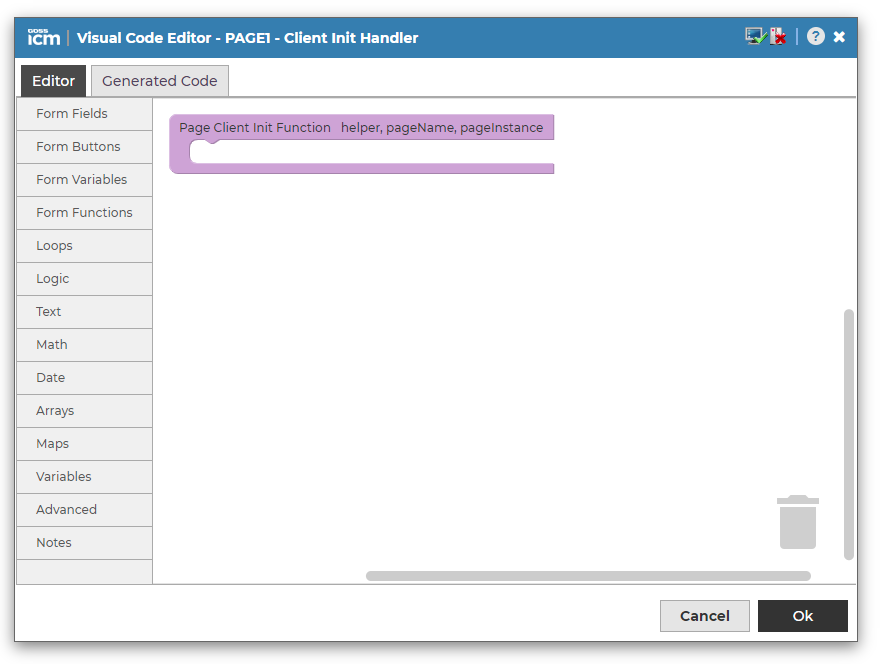
(See 3. Hiding the fields in an earlier tutorial for a reminder of how the script editor works).
Build the following script. You'll need to pick the Back button in the drop-downs of the "hide" blocks, and enter the relevant label:
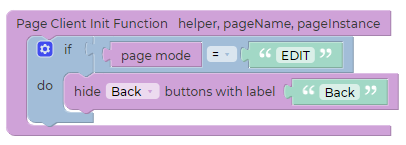
The label needs to match the text of your back link. There is a block that can hide all back buttons (without specifying the label) but that would also hide the cancel button.
Do the same on each page of your form (you can copy and paste the blocks).
Save and publish your form to see how the buttons behave. Note how the update and cancel buttons are hidden when filling out the form, but when editing an existing page, the navigation buttons are hidden and the update and cancel buttons appear.
7. Congratulations!
You've now built a multipage form with a check answers page you can publish on your site. It should behave like either the Check Answers Example - Navigation Buttons or Check Answers Example - Wizard Buttons, depending on the design you chose in steps five and six.
In this exercise you learnt:
- How to use a Handlebars template to generate a summary of the form
- How wizard buttons provide extra buttons in edit mode
- How to hide buttons in certain page modes
Further reading
These pages cover some of the more advanced elements this tutorial introduced:


