Summaries - Check Answers Page
3. Create a summary
The summary created in the Multipage Forms and Navigation tutorial displayed the values entered into all of the fields of the form in a table.
This time we're going to create a card to display each page, which automatically includes edit links so a user can go back and change their answers.
HTML template
Using the same HTML template (server side) field as the previous tutorial, this time pick "Non Blank Summary Card" for all pages:

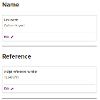
This will generate a template that includes all of the form pages and fields. Each page is represented by a card, and each card includes an edit link:

You can edit the template to exclude elements or add additional text.
Edit links
The edit links are generated by these lines in the template:
{{NAVIGATIONBUTTON action="BACKLINK" label="Edit" extraClass="summaryaction cta-link cta-link--link cta-link--edit" pageName="NAME" mode="EDIT"}}
The important parts are:
- action="BACKLINK" - The template will create a back link rather than a button
- label="Edit" - This is the text visible on the page, you can change it if you want to
- pageName="NAME" - The page that the link will take you to
- mode="EDIT" - The page will be displayed in edit mode. This mode is used by the wizard button fields to work out which buttons to display
The Navigation Button Helper article has more information about creating buttons using Handlebars.


