Each appointment type has its own booking form. This form is set in the article extras of the Slot Type Template for your appointment so it can be customised depending on the information you need to be collected prior to the appointment being booked.
Booking forms for each appointment type are also made public on the site by relating them to articles using the "Form Service - Diary Planner Appointment" template.
Appointments are booked in one of two ways.
Select a Time Slot from a Calendar
A user with access to the Slot Booking calendars can select a time slot to make a booking. These users will generally be members of staff because the calendars show all existing bookings.
When a user selects an empty time slot in a calendar they are taken to the form set in the "Create Appointment Form" field in the calendar's article extras. By default this is a form called "Default Diary Planner Appointment Selection". This form lets the user pick which type of appointment they want to create.

The items in the drop-down are articles in iCM that use the Slot Type Template and are located beneath the "Slot Type Search Root" field in the calendar's article extras.
When this page is submitted the user is taken to the relevant booking form for the chosen appointment type. This appointment booking form is set in the Slot Type article extras for that appointment type.
Public Booking Form
Members of the public who don't have access to the calendars use the same appointment booking forms as staff users (ie the booking forms set in the Slot Type article extras).
However, because members of the public won't have access to the calendars, each appointment booking form should be published on your site using the "Forms Service - Diary Planner Appointment" template.
Public booking forms look up available time slots as part of the booking process.
Example Appointment Booking Form
Diary Planner includes an example booking form and a form blueprint you can use to make your own booking forms for different types of appointment (the example form is just the blueprint published as a form).
Each appointment type should have its own booking form. This form is used whether the booking is made via a calendar or from a public Forms Service article.
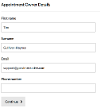
The standard blueprint form will always collect the booker's name and either their email address or phone number.

If the booking is being made from a calendar, the next page displays the date and time selected on the calendar. If not, this step is skipped.

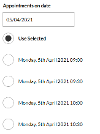
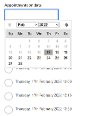
The form then displays a list of the next available time slots and a calendar to select a different day for the booking.

The view on the public booking forms is similar. Users can select a date and are then given a list of available times.

Customising the Form
You can add additional fields to the first page of the form. If you do add fields to the form you will also need to update the "Check your answers" (CYA) template field on the CYA page, and update the custom read-only template in the form settings.
See Creating New Appointment Types for detailed instructions.
Confirmation
The confirmation page of the booking process is actually a separate form, linked to when the booking form is submitted.
The same form is displayed at the end of the appointment booking, rescheduling and amendment processes. It is a two-page form that displays two configurable messages to the user.
The first message is a placeholder displayed while the appointment is being created, the second once the appointment has been confirmed. The messages can be set in the Email and Message Templates.


