Multipage Forms and Navigation
3. Add and name pages
When you first open the design area, you'll see a single page called PAGE1.

Add new pages
To add new pages, press the + tab.

For this tutorial, create a total of four pages.
Name your pages
To make pages easier to work with, we recommend naming them.
Open the Page Settings section of the right-hand Settings Panel. This list of settings is unique for each page. The first setting is the page name.

Page names must begin with a letter and can only contain letters and numbers.
Name your pages INTRO, NAME, REFERENCE, CHECK.

Did you know?
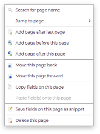
If you right-click anywhere on a page, there's a menu with options to add pages, change the order of pages, or quickly jump to any page on your form.

Last modified on 1 June 2022


