All media items in iCM must be created in a group. That's because it is the group, not the individual media item, that holds information about website security (that is, who can see the media item).
Create or Edit a Media Item
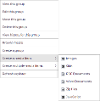
To create a new media item, right-click on a media group and select "Create a media item". The menu will list the types of media item your user is allowed to create. This is controlled by your user's iCM Content Roots. Click on the type of file you are uploading.

To edit an existing media item, double-click on it.

Title, Description and Keywords
Each media item must have a title and description. How these are used will depend upon the theme your website is using, but as a general rule, the title will appear wherever there is a link to your media item and the description will appear alongside it in search results.
For images, the description may be used as the alt text. There's more information about images, alt text and captions in the Inlines - Standard Behaviour section.
Keywords can be used to tag a media item so that it returns in the site search. The keywords may also be visible in the description of the media item returned in the search.
In most cases we don't recommend using many (or any) keywords. iCM automatically indexes the title, description and file name of the media item and, in the case of PDFs and other documents, indexes the text content of the files too.
Embedding Links
Although these options are present for all media types, they are only used by images when added to articles using the image inline.
Pick either an article, or a link from the external link library, using the "Select" buttons. Then, when you add your image to an article, the inline dialog lets you pick "Link to related article/link". Your image will now act as a link to your chosen content. There's a full description in the Inlines - Standard Behaviour article.
Files
The options on the files tab will change depending upon the type of media you are creating. The size of file you can upload will be limited by the Media Types definition. There will also be file size limits on your server, contact the support team if you are having problems with this.
Use the "Choose File" button to open an explorer window and select a file to upload from your PC.
If you are editing an existing media item, the current file is displayed in the "Current document" section. Clicking on the current file will preview or download it as appropriate.
If you need to replace an existing file, upload a new one - the old version will be removed automatically. You can also clear an optional file by pressing the "Clear" option in the action menu.
For more information about image file types, see Using the iCM Image Editor.
Components
Depending on the media type you are working with, the files tab may display multiple components.
Components allow multiple files to be associated with a single media item. This is most commonly seen when working with image media types. Images have "variant" components which allow you to upload different sizes and aspect ratios.
Media components are managed when media type definitions are first set up. Some components are set as required, others are optional. You can clear optional components from the action menu.
Metadata
Metadata can also be added to media items.
Metadata allows items to be tagged so they can appear in other products. For example the List template can be configured to display media items that have common metadata values. Metadata can also be used to bring media items into the site search.
Schedule
The schedule tab contains a range of options that control when the media item will be available on your site and whether or not it needs to be regularly updated.
Hide a Media Item
It's possible to remove a media item from the site without deleting it.
- Open the "Schedule" tab
- Set the "Display" option to "No"
- You can also use the "Display End" date to hide a media item at a certain date and time.
Set a Media Item to Go Live in the Future
A brand new media item can be set to appear on the site at a time in the future.
- Open the "Schedule" tab
- Set the "Display Start" date to a future date and time
- "Submit" the media item
- The media item icon will appear greyed-out until the start time is reached
Set up Reminders to Review a Media Item
These options are used in conjunction with the iCM escalation settings.
- Open the "Schedule" tab
- Set the "Update due" to "Regularly" or "Once"
- Set the date or frequency of the update
- Include notes that will remind you off what needs to be updated
- "Submit" the media item
Properties
The properties tab displays information about this media item, including when it was created, the user who last modified it and the group it is in. Selecting a new group here will move the media item.
Adding Media to your Articles
Once you have created media items in iCM you'll want to add them to your web pages. There are two main ways to do this.
Related content is generally output in the right-hand column of a page (this depends on the theme your site is using). It's designed for documents that can be downloaded, but also for banner images, and depending on the template, carousels and full-width panels.
Article inlines are used to add media items directly into your article text. This lets you position images, downloads and videos exactly where you want them on the page.


