Before you Start
When you create a new case type in Case Management, as well as designing the form that users will fill out to raise a case, you'll need to plan how the case is going to be handled and what business rules will apply to it.
This checklist sets out the minimum you'll need to think about before creating a new case type. Almost all of these settings can be updated in the case configuration once they've been set.
- Your case type needs a unique name and a description. You can categorise cases within a type using the case Subtypes
- Does your case pass through formal Case Stages?
- What statuses might you need?
- What needs to happen to resolve the case? Will you need to set up different Closure Reasons
- Who is going to handle the case? Which User Groups will be involved?
- Are cases subject to SLAs and Working Hours
- Are there any formal Tasks that need to be carried out?
- What Emails and Notifications should be sent?
- Should case linking be enabled?
- Will you need to be able to Convert Case from one type to another?
- Are there any automated Case Routines that need to run?
And of course, you'll need to design a form to raise your new case type, which is covered on the next page.
Create a Form to Raise a Case
You can build your own forms to raise cases as new case types in Case Management. You'll need to add a snippet to your form, then configure your new case in the configuration manager.
Step 1 - Build a Form
Create a form people can use to raise a case. Make sure it captures everything your case managers need to know.
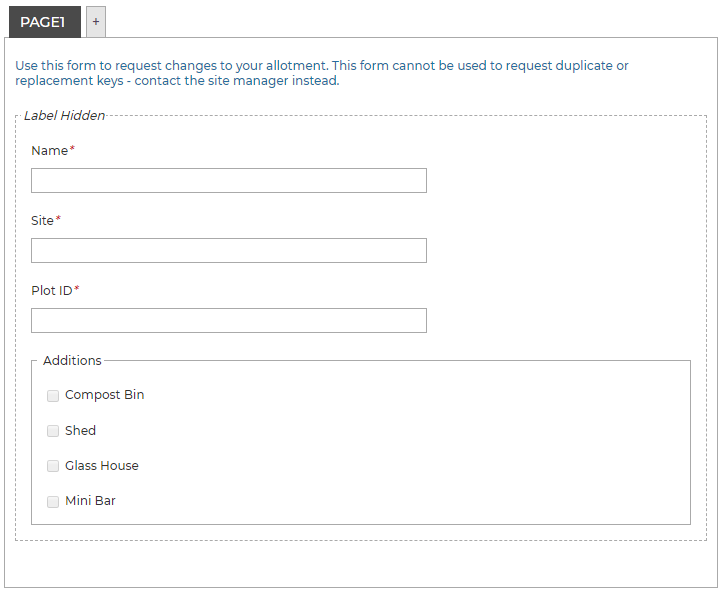
Searchable Fields
If you want values submitted by your form to be searchable in the Case Search, set the form fields as searchable:

This will also let you create custom filters and display the values in search results.
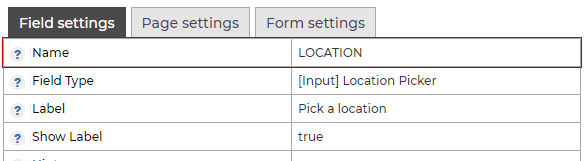
Location Data
If your form collects location data, and you want to use that location on the Case Search or the Worklist Dashboard, the latitude and longitude coordinates should be saved in a field called LOCATION.
One way to do this is by including a Location Picker field on the forms used to raise a case and naming it LOCATION:
If you are using an Address Lookup field that returns latitude and longitude (the GOSS provider does), these values can be saved in a hidden field called LOCATION:
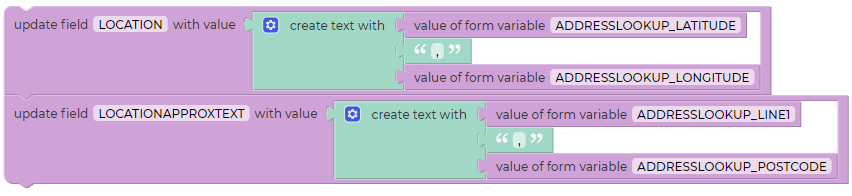
Note that the map pin popups in the Worklist Dashboard use a field called LOCATIONAPPROXTEXT to display a summary of the address.
Step 2 - Add the Snippet
Add the "Case Management - New Case Multi" snippet to the final page of your form. It includes a submit button.

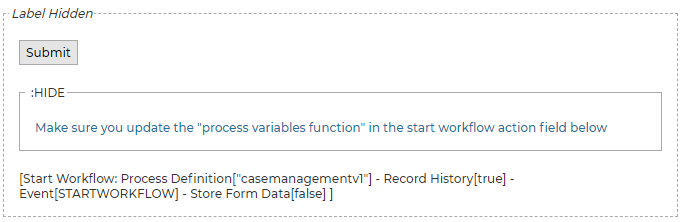
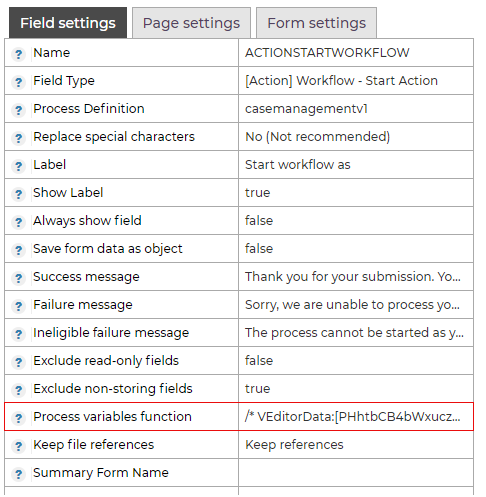
Step 3 - Update the Start Workflow Field
Update the process variable function of the Start Workflow field.
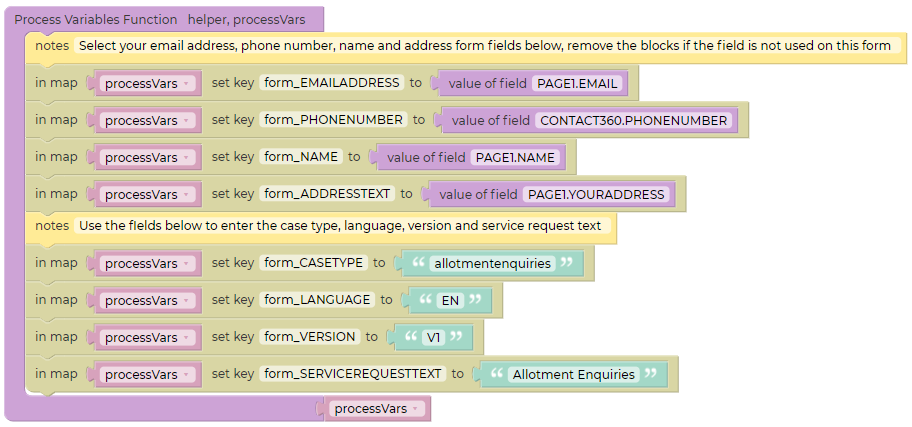
Pick the fields your form uses to collect the person's name, email, phone number and address. Delete blocks that aren't being used.
The following blocks must be set:
form_EMAILADDRESS enables the "Contact" button when a case manager is viewing the caseform_CASETYPE block should be the name of your case in lowercase without spaces. This is known as the case type ID and you'll need to know it when you set up the case configurationform_SERVICEREQUESTTEXT is visible to the user who raised the case. It appears as the title of the card in User Requests. The title displayed to staff users on the Self Service template uses the case name set in the case case configuration
Optionally you can set:
form_CASESTATUS to set the initial status of the case. This must be one of the statuses configured for the case typeform_CASEASSIGNEE to assign the case directly to a case manager. This is the username of the case manager (ie the account username, which may be a GUID)form_CASETARGETDATE to set the SLA. This should be an ISO-8601 date-time string, for example 2024-05-10T10:25:04.411Zform_CASESUBTYPE to set the case subtype. This must be one of the subtypes configured for the case type
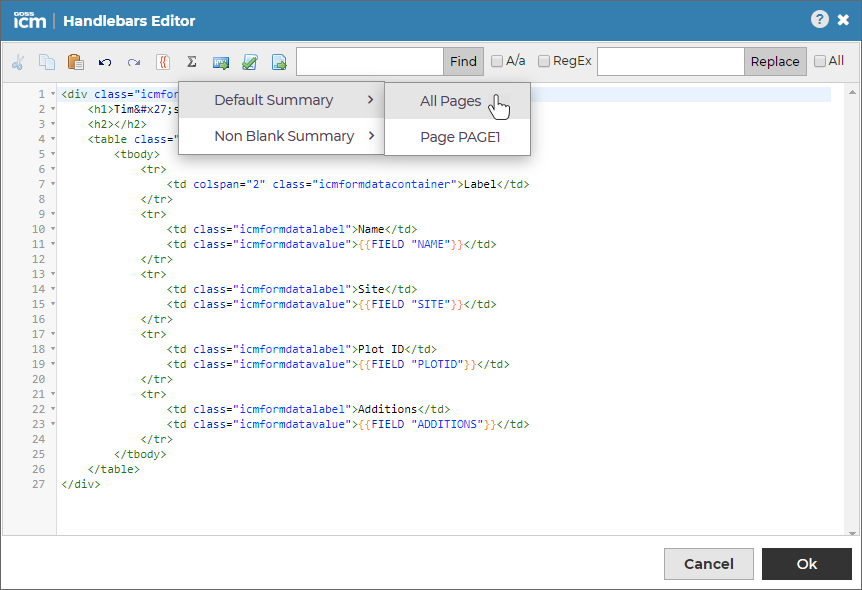
Step 4 - Read Only Summary
In your Form Settings, create a Custom Read Only template.
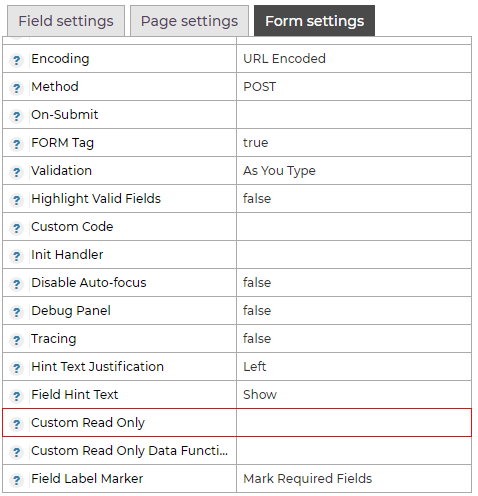
This template is displayed to case managers when the press the "Case Details" button. You can include whichever fields from your form the case manager might need to see. To include them all use the default summary.
Case Configuration Wizard
To add new case types to Case Management you'll first need to Create a Form to Raise a Case.
Next, use the Configuration Manager to set up who will manage the case, the options available to the case managers, plus things like targets and SLAs.
Configuration
The Configuration Manager is a tool you can use to set up your new case type and change the configuration for existing ones.
Pick a Product
The first page of the form lists the products integrated with the Configuration Manager.
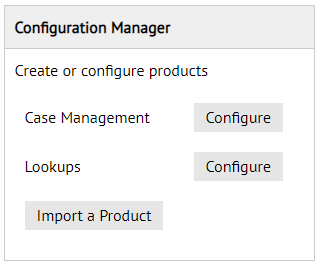
Pick "Case Management".
Create a New Case Type
Page two lists the current case types, then gives options to create a new type, or import a previously exported type.
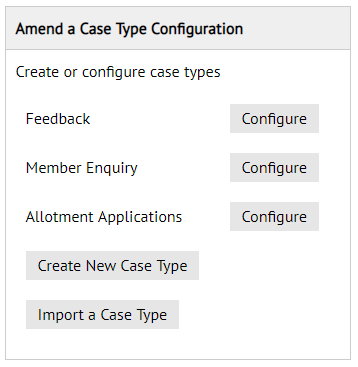
Pick "Create New Case Type".
Complete the Form
Complete the form following the guidance text and field hints provided. Almost every field can be edited later, so don't worry if you make a mistake.
Case Name and ID
The first values you need to enter are the case type and it's ID.
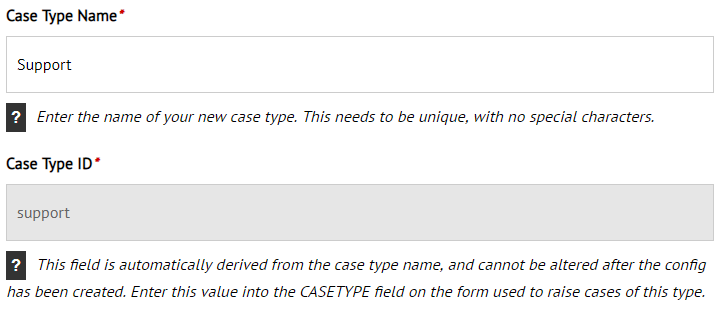
The name you enter will be visible to staff and users using templates like Self Service and User Requests, appear in emails, recorded in the case history, and used in any dashboards and reports you have set up.
The ID must match the value of the CASETYPE field in the form used to raise cases of this type.
Once the ID is set it cannot be changed. You can edit your case and change the name once you've completed the wizard.
Additional Settings
Once your new case type has been created you can configure additional settings. The new case type wizard doesn't set up things like tasks, statuses or automated routines.
It's a good idea to review all of the settings before you publish your form and let people start raising cases. In particular you'll want to check the main Setup and Naming and the Emails and Notifications.
See the Case Configuration Overview for a full description of everything you can configure and a list of all of the default settings.
Publish your Form
You've now got a form to start your case and all of the settings for what happens when someone submits it.
The final step is to publish your form on your site so people can access it.
Create an Article
It's a good idea to publish your form in a secure area of your site so you can test all of the settings first.
Create an article and set it to use the Forms Service template.
On the Related Content tab, find your form in the left-hand panel and add it to the right-hand panel.
Submit your article and visit your new form on your website to test it.
Share this page


