Introduction
These pages describe how to create locations, events and tickets via your website. Content is created by filling out forms which provide a step-by-step process guiding you through all of the things that need to be set up.
This flow diagram gives an overview of the process.

Create a Location
To add a location via your Staff Portal follow the following steps:
- Log into the Staff Portal
- Go to Manage Platform
- Under Manage Platform select Event Management under "Bookings"
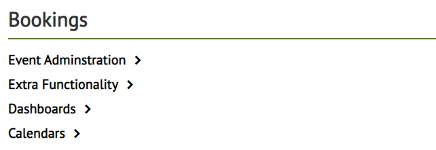
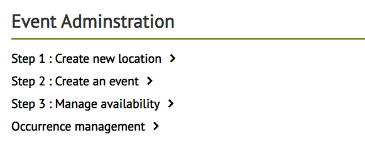
- Select Step 1 - Create Location
When you arrive on the Create Location page you can add the "Name", "Summary" of the Location, and "Body" for information about the Location. In the "Site area to create the article" section you can choose what website the location that you are creating should be available on.
You can add an image to the location, this image will be used for any events created that do not have their own image.
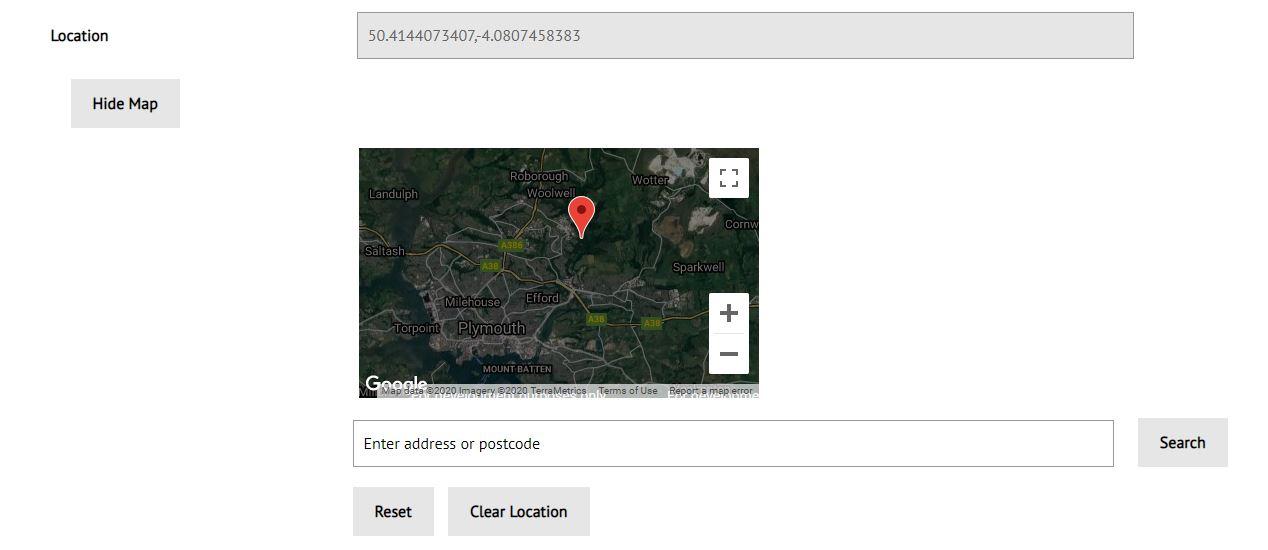
As per the image below, use the "Location" field to select exactly where the location is.

Selecting the "Map" opens Google Maps and you can either exactly pinpoint where your location is manually or type in a postcode. The Google Maps location will appear on any events that you create that use this location.
Finally, you can add any additional information for the Location including:
- Full Address
- Opening times (free text)
- Phone Number
- Website URL (if an external URL exists)
- Facebook URL
- Twitter URL
- Categories (This uses Metadata, click here to read about creating and managing Metadata)
Create an Event
The Create Event area of the site not only creates an event but also sets up defaults for any future occurrences of this event. All information added at this stage will save the default settings for this event.
To add an event via your Staff Portal follow the following steps:
- Log into the Staff Portal
- Go to Manage Platform
- Under Manage Platform select Event Management under "Bookings"
- Select Step 2: Create an event
When you arrive on the Create Event page you can add the "Name", "Summary" of the Event, and "Body" for detailed information. In the "Site area to create the article" section you can choose what area of the website the event should appear.
You can add an image to the event, if no image is chosen then the event will use the image associated with the location that will be selected. If there is no image associated to the event or location then no image will be shown.
Additional information can be added to the event on the first page, including:
- Website and Social Media URLs (if applicable)
- Categories (this uses metadata)
Once you have submitted on the first page, the next step is to set up default settings for your event.
Default Settings
Default settings can be created for an occurrence. These settings speed up the creation of your occurrences by prefilling many of the details, packages and tickets available to them.
Creating the Defaults
The default settings form is usually accessed as part of the contribute event process. Once a user has defined an event, they can then manage it via a User Requests or Self Service article.
The Default Settings task form allows the event administrator to set values for the location, maximum capacity, link to terms and conditions, booking plugins and booking notifications.
Page two of the form allows default packages and tickets to be created. These elements are created in exactly the same way as when you schedule a new event occurrence.
At the end of the form is a checkbox. If checked users are redirected straight to the "create new occurrence" form.
Using the Defaults
Once defaults have been created, their values will appear when creating a new event occurrence. Default packages cannot be removed from an event instance, but can be disabled/hidden by unchecking the "Active" checkbox. Other defaulted values can be updated while you are creating your event occurrences. Defaulted settings can be updated via Self Service, see Defaults.
Defaults Settings Page
Location
Pick the location where your event is taking place. Events can be set up to have a default location, which is set in the Event article extras - see Create a Location for more information. If your Bookings Configuration End Point has
If user permissions have been restricted then the drop-down lists all articles using the Location template that your user has access to. The Bookings configuration holds the ID of this template.
Maximum Capacity
Input the default maximum capacity for an occurrence of this event
Communications
Booking Form Text
This drop-down lists the available options you can use to customise the text that will appear on your booking forms. Overrides are set in the configuration End Point and explained in more detail in the Booking Text Overrides article. If you are unsure which to pick, use "Default".
Booking Confirmation Email
This drop-down field lists all of the "Booking confirmation" templates in the Communications Template Manager. Select the one you'd like to use. See Email and Message Template Configuration for more information.
Payment Confirmation Message
This drop-down field lists all of the "Successful payment" templates in the Communications Template Manager. Select the one you'd like to use. See Email and Message Template Configuration for more information.
Terms and Conditions
Enter either an article ID or a full URL (including the http:// prefix) to display a link to the event's terms and conditions to a user during the booking process. Users have to accept the terms and conditions (using a checkbox) before paying for their booking. Leave this field blank to disable terms and conditions.
Additional Information
Capture Contact Number
Check this box to display a contact number field on the booking form. If you request a phone number you can then choose whether phone, email, either, or both are required fields on the booking forms.
Allow Notes
Check this box to allow bookers to add notes to their booking at the point they pay (either online or during the cash payment process). Notes are emailed to the address entered here, using the "Notes" template in the Communications Template Manager.
Require Offline Reference
If this box is checked any users able to register offline payments will also have to enter a reference number for that payment when confirming bookings. The default value is set in the configuration End Point.
Bookings Plugins
If plugins have been enabled in the Bookings configuration, they will be listed in this drop-down field. The selected plugin will be displayed to the end user during their booking, before payment is taken. If no plugins are present, the field displays "not configured".
Other Settings
Enable Basket
Tick this box to enable the Basket Integration. Note that if your event only has free tickets, or it is possible to only select free tickets, you should not enable the basket.
Use Packages
Whether or not you want to create packages of tickets for this occurrence. Check this box to be able to create tickets.
Events without packages of tickets are free and have unlimited places. People may still be able to book onto them, assuming the template displaying the event allows bookings. This feature is designed to be used in circumstances where an occurrence is serving as an announcement or scheduled date (adding Christmas Day to a calendar for example).
Packages can be disabled globally in the Bookings configuration End Point.
Allow Cancelling
Allow logged in users to cancel their bookings through user requests
Booking Notifications
Choose to have no emails sent when a booking is made, an email sent whenever a booking is made, or have an email sent when a booking is made and there are only X places are left.
Create Default Packages
Once you have created the basic event information you will be able to add packages if you have selected that this event should have them.
These packages will be the default that will always be available when adding a new occurrence of this event. If you do not have default packages and choose to create a new occurrence of an event then a package will need to be created each time.
A package can use a single ticket or multiple tickets. For example an Adult package would use one Adult ticket, a Family package may use 2 x Adult tickets and 2 x Child tickets.
To create your first package, select "Add Package".

Once you have selected Add Package there are fields that need to be filled in. These fields include the following:
- Title - Adult, Child, Family etc. This is the title shown to the user on the booking page
- Description - Information about the package displayed beneath the title
- Minimum Purchase - Minimum amount that can be purchased in one transaction
- Maximum Purchase - Maximum amount that can be purchased in one transaction
- Maximum - Total number of this package that can be sold overall for this occurrence. This will be dependent on the location or event for this occurrence
- Mandatory-Yes or No drop down. If Yes, then the mandatory packages appear under the "Tickets" header of the booking form, non-mandatory packages appear under the "Additional Options" header. If all packages are optional, the additional options section doesn't appear - all packages are listed as tickets
- Price - The price for this package
- Available From - Date that the package can be available from
- Available To - Date that the package will be available to
- Create Ticket - Checkbox, if selected then a matching ticket will be created. You will want this for tickets such as Adult, Child etc. For packages that may use more than one ticket you will not want this selected. See Edit Packages
- Active - Whether the package will be shown on the booking page or not
If you do not require packages to contain more than one ticket then once you have added your basic packages (Adult ticket, child ticket) then you can click submit to move forward and, if "Create Occurrence" is selected, create a new occurrence.
If you do require packages to contain multiple tickets (e.g. family ticket) then you will have to see Edit Packages.
If you require a package to use specific tickets that are only available by purchasing the package then go to Advanced Settings.
Edit Packages
Editing packages allows you to create a package that may use up multiple tickets.
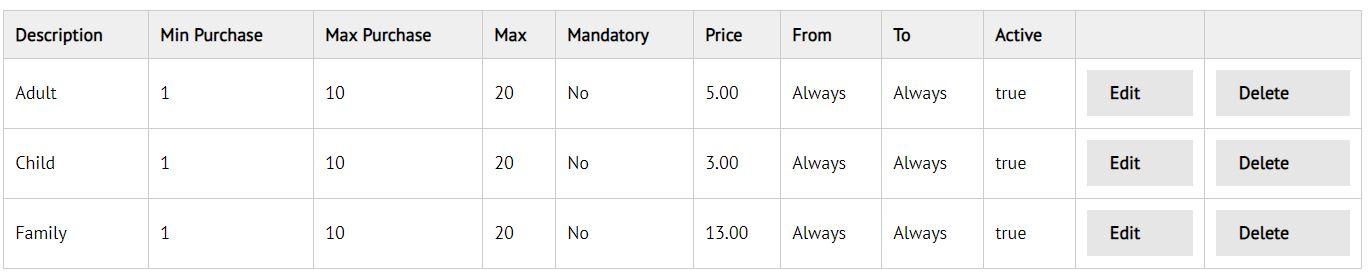
An example of this would be for a Family package that uses 2 x Adult Tickets and 2 x Child tickets. This situation you would require an Adult package created with Create Ticket selected, a Child package created with 'Create Ticket' selected, and a Family package with ' Create Ticket' NOT selected.
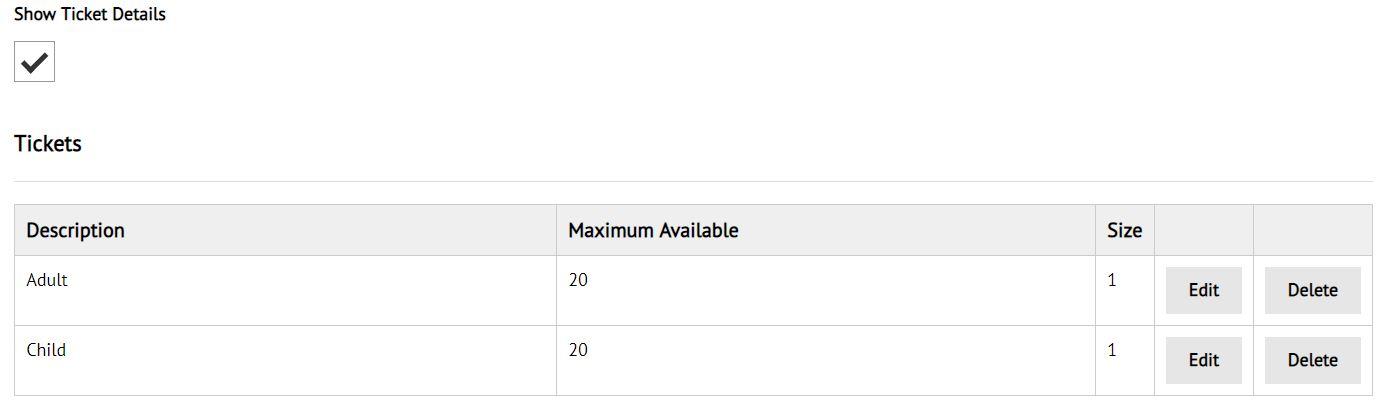
If you have created this you should end up with Packages that looks like below
To check to see if you have created the correct tickets click Show Ticket Details under Advanced Settings to show the existing tickets.
To edit a Package go to the Edit button on the right hand side of the Packages table for the Package you want to edit. In this situation I want to edit the Family package. Clicking edit brings up all of the options as creating a new package however it also includes 'Package Tickets'.
Package Tickets lets me choose what tickets I should use for this package. So I can choose Adult and put 2 in Quantity and then choose Child and put 2 in Quantity.
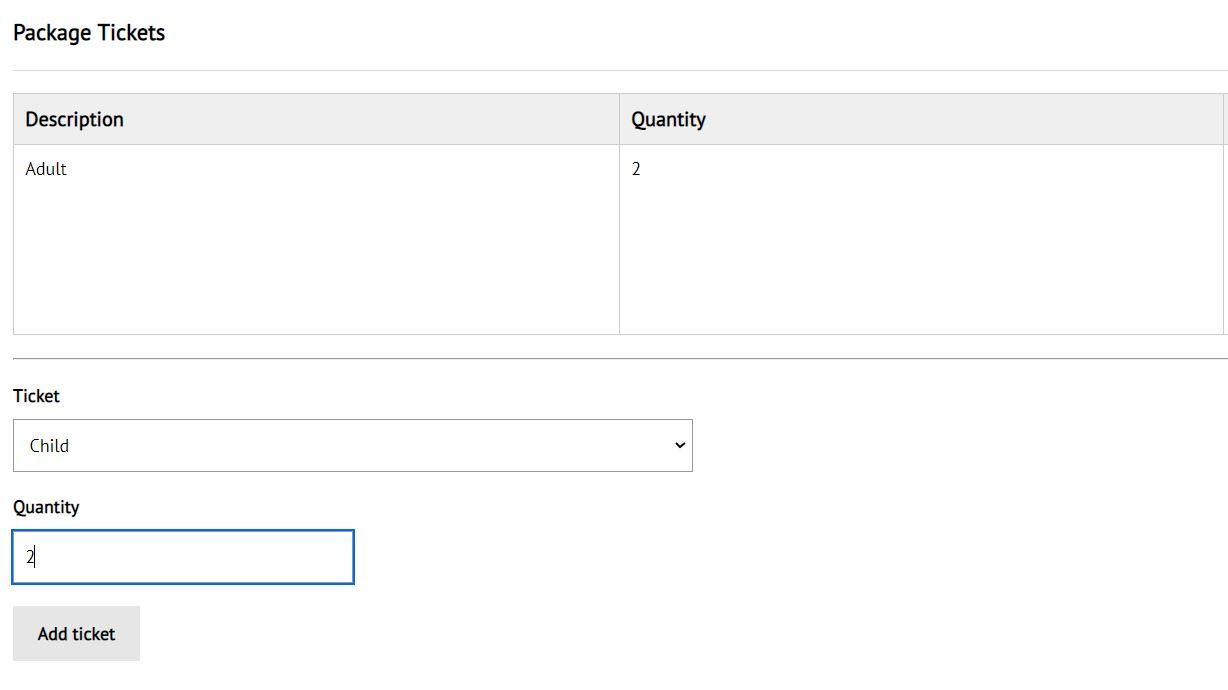
Once you have associated the correct tickets with the package select 'Update package'.
This method works for situations such as Family tickets however this can also be used for discounted offers e.g. 5 tickets (price of 4).
Advanced Tickets
The Advanced Settings section allows you to be specific with how many tickets may be available (this can vary from how many packages are available), to set the size of each ticket, and to add tickets that exist without a matching package.
Maximum
The Maximum field sets the maximum number of tickets that can be purchased for this instance of the event. A ticket can be part of more than one package. For example, Adult tickets could be used for Adult packages or Family packages (includes 2 Adult tickets). If 5 Adult packages were sold then this would use 5 of the Adult tickets, if 5 of the Family packages were sold then this would use up 10 of the Adult tickets.
A package cannot be purchased if the package has if all of the package allocation (maximum amount) has been sold or if the tickets allocation (maximum) has been sold.
Size
The size field sets the number of places from the event capacity this ticket occupies.
For example, if your event has a capacity of ten, and you create a ticket with a size of two, only five tickets will be able to be sold, no matter how many packages they are compiled into. Note, this could also be achieved by creating a ticket with a size of one, but adding two of them to each package.
Other examples include creating size zero tickets, which won't use up any of your event's capacity, but can be used to buy add-ons that compliment the standard tickets.
Tickets without package
A ticket can be created without having a package created. Multiple tickets can be included a package, for example this could be the case for a package that includes lunch and unlimited refreshments. The user may not be able to see the options for unlimited refreshments or lunch as these tickets may only be purchasable with the specific package.
Create an Occurrence
You will get to the Create an Occurrence page when the event defaults have been created. This page is also accessible when adding a new occurrence for an existing event.
The options on this page are as follows:
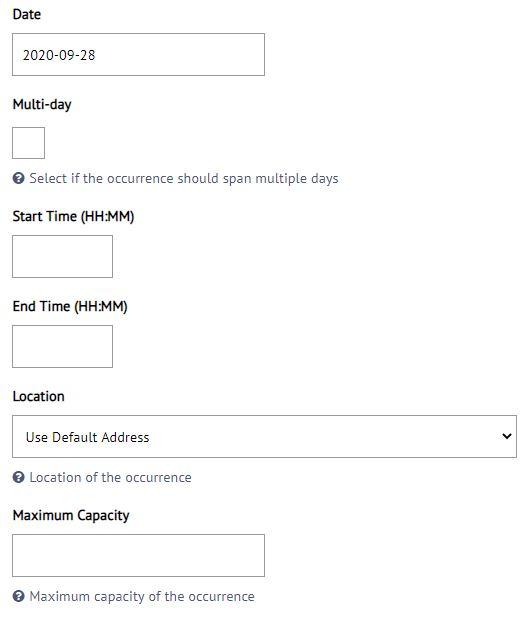
- Event - This option is not-editable, this is the title of the event
- Date - This is the date that the event will take place, if this is a Multi-day event then this is the first date of the event
- Multi-day - If this checkbox is selected then the occurrence can span over multiple days, an additional checkbox for End date will appear underneath Start Time (HH:MM)
- Start Time (HH:MM) - This is a field where you can type the time in using the format HH:MM
- End Time (HH:MM) - This is a field where you can type the time in using the format HH:MM
- Location - The location of the occurrence can be different from the default location of the event, if the location should be the same as the default location then the location should be selected as 'Use Default Address'
- Maximum Capacity - Type in the Maximum Capacity for this occurrence.
The remainder of the Create an Occurrence page stores the default information of the events. If you want to have any different information for this occurrence of this event in the Communications, Additional Information, or Booking Notifications then these can be changed. Any changes will be for this occurrence only.
Packages/Tickets for this Instance
If the "Use Packages" checkbox is checked on the Create an Occurrence page then once you select Next page you will be taken to a "Use Packages". If "Use Packages" is not checked then you will be taken to a page to add additional occurrences.
Any default packages that have been created for this event will appear here. This page is to amend/add/remove packages for this occurrence only! If you make changes to packages on this page then this will not affect any separate occurrence, default packages will remain for all separate occurrences.
To amend the package details, this is done in exactly the same way as Creating Default Packages
Additional Occurrences
To add repeats of the occurrence that has been created check the checkbox for "Add additional occurrences?"
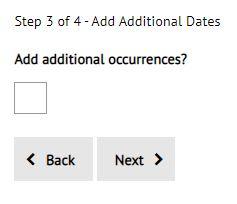
Once this checkbox has been selected more options will appear. These options are:
- From - This option lets you choose the 2nd occurrence
- To - This option lets you choose how long the additional occurrences should last until
- Frequency - This is a drop down which lets you choose Daily, Weekly or Monthly. The options below this drop down will change depending on what is selected in this drop down.
- "Daily Options" contains a drop down to choose whether the event should be replicated Every day, Week days, or Week ends. Once chosen, selecting "Add to List" will populate with every day, week day or weekend between the "From" date until the "To" date.
- "Weekly Options" contains check boxes for each day of the week. Once you have chosen which days of the week you want, selecting "Add to List" will populate with every day of the week selected between the "From" date until the "To" date.
- "Monthly Options" contains a drop down for "Either" which contains "Day of the Week" and "Day of the Month".
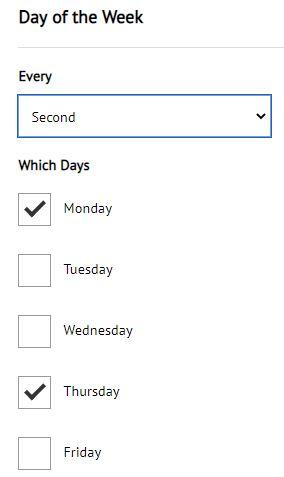
- Selecting "Day of the Week" provides a checkbox for "Every" which contains "First", "Second", "Third" & "Fourth'" Underneath this are check boxes for each day of the week. So choosing "First" and selecting Monday and Tuesday will create the event for every first Monday and Tuesday of each month between the From date until the To date.
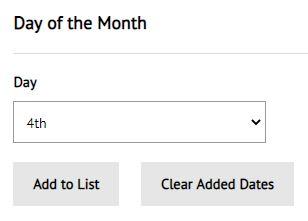
- Selecting "Day of the Month" provides a drop down with every day of the month (from 1st - 31st), selecting "Add to List" will add the dates. Choosing the 4th, will create an occurrence for every 4th of the month between the From date until the To date. More days can be added by choosing another day and selecting Add to List.
- Selecting "Day of the Week" provides a checkbox for "Every" which contains "First", "Second", "Third" & "Fourth'" Underneath this are check boxes for each day of the week. So choosing "First" and selecting Monday and Tuesday will create the event for every first Monday and Tuesday of each month between the From date until the To date.
Share this page


